Jörn's idea of building the wall on Thursday, January 2nd, was first of all thwarted by the fact that some shops, including the hardware store, were still closed. However, the wood warehouse was open, so we were able to get 48 meters of rough-cut 2X2s in approximately three-meter lengths and start with the measuring and cutting. It was good that we didn't need them to be EXACTLY three meters long, because none of them were--Jacob measured several, and they were between 296 centimeters and 304, and the ends were, for the most part, cut very badly. It amuses me that although the lengths are in metric, the width is in inches, but being rough cut, the "two inches" each way varied from just under 4 1/2 centimeters to just over 5.
Here Jacob is making the first cut, with plenty of supervision:

In fact, we had even more of an audience than I had realized! We'd told the little girls that they could NOT come out on the kitchen terrace while we were cutting the wood, but I didn't know about this photo, taken by Jörn, until I uploaded the photos to the computer.

On Friday the 3rd we went to the hardware store and bought 70x4 mm screws and finally got started with the actual construction. I did all of the measuring and marking and Jacob did most of the cutting and drilling of pilot holes.


We started with the frame for the second shortest section, the one coming out next to the window. This shows it with some of the noggins in, and it's upside down: the top right corner has a notch cut out of it to fit around the skirting board (is it called that when it's actually tile??), so that's actually the bottom.

Seeing how well it fits (and still missing one noggin):

Testing the strength after the final noggin was put in:

Jacob and I worked really well together, at least that first day, and had quite a good rhythm going of measuring, cutting, drilling, and putting in screws, and if we could have continued at that pace, we probably could have finished in another day, but Jacob was out in the afternoon and I did the second section almost entirely by myself. Once it was completed, we held them in place to see if they fit and how they would look:

Marie steadying something for me while I drill a pilot hole:

On Saturday, January 4th, Jacob managed to take enough time out of his busy schedule that we completed the third, and longest, section. They were so well balanced and fit so well together, that it was very easy to hold them up for a photo (yes, I'm bragging), even before they were fastened together or fastened to the walls of the room:

Here Jacob and I are working on one of the corners:

Lukas helping steady the pieces while Jacob and I continue fastening things together:

The ends are fastened to the walls with coach bolts, three on each wall. That doesn't seem like much to me, but the shape of the partition is such that it could stand up by itself without any fastening at all, and it definitely seems very sturdy.
On the Friday we had ordered 4mm thick MDF, medium-density fiberboard, which was delivered 15 minutes later, but we didn't start working with it until Monday, January 6th, which was a holiday. They had told us that the MDF was 183 by 220 centimeters, so we'd planned the frame accordingly, making the longest section exactly 220 centimeters wide to accommodate that with minimal cutting, and putting noggins at 183 centimeters all the way across. Happily, the 183, at least, was correct, but the pieces were actually 221 centimeters long, meaning that for that one single piece we'd hoped to put in easily, we had to cut off one centimeter. But it all worked out and we were far too busy to take photos. I finally took one, from Jacob's side of the room, as Jacob took one of me:

Sometime before the above photo was taken, Jacob had also moved the lamp to Lukas's side of the wall (as that's where the light switch is), and installed a light on his side.
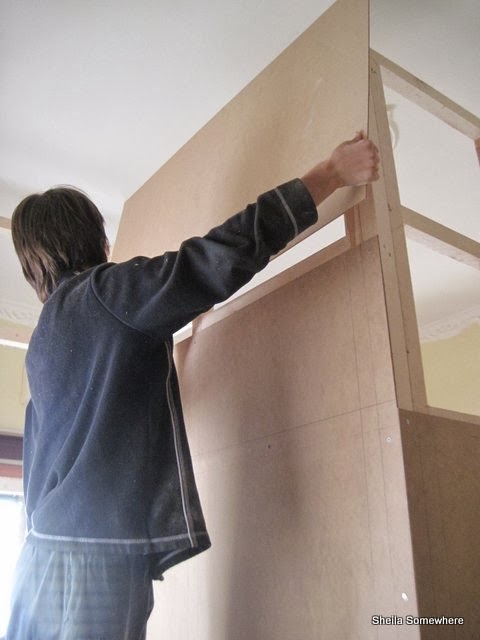
Again, I did all of the measuring and marking, and Jacob most of the cutting. Jacob is taller than I am, so he did most of the work closer to the ceiling:


However, Jacob was busy all afternoon, so I ended up completing Lukas's side of the partition and some of Jacob's by myself, although I did have to get Jörn, Marie, or Lukas to help me carry the largest pieces from the kitchen terrace, through the kitchen, down the hallway, into Lukas's room, and then all in reverse, as I was cutting the details in the corner to fit the molding around the ceiling, not to mention to fit the fact that the walls are not exactly perpendicular to the floor (MY wall is!! I mean the house walls!) and the ceiling not equidistant from the floor! However, there's only one photo of this entire process, because I was occupied with doing the work and Jörn was occupied with keeping the little girls out of the way. Lukas did help some:

And then as of Tuesday the 7th, Christmas vacation was over and regular activities were starting up again, so the rest of the work moved very slowly. The following photos were taken on Thursday, January 9th, Lukas's side completely done, but Jacob's side awaiting his decision as to exactly how we puzzle the pieces in:


A compromise was finally reached, and a photo duly taken on Friday, January 10th, of Jacob driving in the final screw:


It looks very well designed. Are you able to put up a sketch of how the floor plan worked out? I may have to do this down the track and it would be great to know how it worked.
ReplyDeleteBest wishes
Jen in Oz
Hmm...that shouldn't be TOO hard, but it's the getting around to it...
ReplyDeleteMaybe if you remind me? (Probably not in a comment, as I'm not used to getting comments and don't check for them very often!)